LED Taillight Installation Instructions 1973-1988 J-10 / J-20
1. Disconnect negative battery cable
2. Remove taillight lenses from both taillights
3. Remove each taillight housing (2 nuts each)
4. Remove both upper bulbs (leave the reverse light bulb)
5. Cut the original wires from your factory taillight harness, leaving enough wire to connect to the new LED wires.
6. Remove the upper green wire from the top bulb location of the housing (it should push through the housing now that the wire is cut leaving a nice hole to run your new wires)
7. Run the LED wires through the top hole and cut and splice the wires according to the diagram below using the supplied connectors
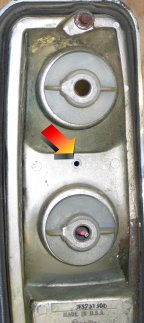
8. Drill a 9/64" (one size over 1/8") in the housing (see below picture for location)
9. Install LED light using the adjustment nut to get the correct distance and tighten it with the nyloc nut on the back of the housing
10. Repeat for other side and double check that all blinkers, brake lights and taillights work
11. Reinstall housings and lenses
12. Enjoy your new LED lights!
Stock Wiring Color
LED Wiring Color
Pink
Red
White
Black
Green
Yellow
Black
Green (Ground)
Drill Hole at Arrow:
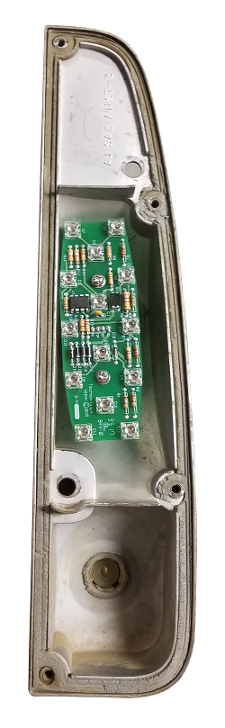
Finished Product:
On the wiring, there will be four wires on the LED's, and they connect as follows:
Green - Ground
Black - Tail light
Red - Stop/turn (connect this wire for RapidFire)
Yellow - Stop/turn (connect this wire for no RapidFire)
Rapid Fire is when the LED gives three rapid flashes followed by bright, constant on (this helps to get people's attention behind you). You will use either the Red or the Yellow, but not both. Whichever wire you don't use will need to be taped off with the end covered / protected.
1. Disconnect negative battery cable
2. Remove taillight lenses from both taillights
3. Remove each taillight housing (2 nuts each)
4. Remove both upper bulbs (leave the reverse light bulb)
5. Cut the original wires from your factory taillight harness, leaving enough wire to connect to the new LED wires.
6. Remove the upper green wire from the top bulb location of the housing (it should push through the housing now that the wire is cut leaving a nice hole to run your new wires)
7. Run the LED wires through the top hole and cut and splice the wires according to the diagram below using the supplied connectors
8. Drill a 9/64" (one size over 1/8") in the housing (see below picture for location)
9. Install LED light using the adjustment nut to get the correct distance and tighten it with the nyloc nut on the back of the housing
10. Repeat for other side and double check that all blinkers, brake lights and taillights work
11. Reinstall housings and lenses
12. Enjoy your new LED lights!
Stock Wiring Color
LED Wiring Color
Pink
Red
White
Black
Green
Yellow
Black
Green (Ground)
Drill Hole at Arrow:
Finished Product:
On the wiring, there will be four wires on the LED's, and they connect as follows:
Green - Ground
Black - Tail light
Red - Stop/turn (connect this wire for RapidFire)
Yellow - Stop/turn (connect this wire for no RapidFire)
Rapid Fire is when the LED gives three rapid flashes followed by bright, constant on (this helps to get people's attention behind you). You will use either the Red or the Yellow, but not both. Whichever wire you don't use will need to be taped off with the end covered / protected.